• Meet Me
  • Sponsor
  • Testimony
  • Print Shoppe
  • Recipes

Forever Beloved

Faith, Love & Truth

April 15, 2017

Pressure Canning Chicken Broth

When I was growing up I was blessed to not only have a Mama that grew her own food, but canned it as well.  Not only my Mama, but all the women in my family.  Many family gatherings would include a circle of women chatting about their recent crops and what they were planning on canning with them.  It was a given that once I had a household of my own, I would follow in all their footsteps.  And proudly, I have.

I spent the first 18 years of my canning life afraid of pressure canning.  I think we’ve all heard a terrifying story or two about Great Aunt Edith having her pressure canner explode on her.  With hearing stories like that, I had completely written off pressure canning.

As my garden grew every year, so did the items on my list to can.  Some of those items had to be processed in a pressure canner.  I finally talked myself into giving it a try.

The first time I took the pressure canner out of the box and sat it on my stove, I was nervous.  I wasn’t going to let my fear keep me from doing it, but a healthy dose of caution guided my every step.  I kept having visions of my day ending like Great Aunt Edith’s did: my wild imagination conjured images of explosions, and shrapnel flying all over and through me that would lead to the headlines, “Woman Killed by Flying Tomatoes in a Pressure Canner Explosion.”

I made it through that canning session just fine, praise the Lord.  Pressure canning is not difficult, not dangerous and not all that time consuming.

For years when I made chicken broth I would put it into baggies and freeze it. I would fill the baggie, lay it flat to freeze and then find great satisfaction in how nice and neat they look when you stack them.

Except they are frozen.  And when I’m whipping up a recipe, I have to take time to defrost them.

I wanted instant chicken broth.

I am by no means a pressure canning expert.  But today, I’m going to walk you through pressure canning chicken broth.

First things first, you need to make your chicken broth.

Every time I cook a chicken, whether in my rotisserie or in the oven, I save every leftover bit and bone and broth and grease.  I put it all in a large freezer-safe tupperware container and put it in the freezer.  Each time I cook chicken, I pull the container out and add to it until I have what I think is enough to make chicken broth.  Normally, once that container is full I’ll do a go of broth.  Or you could just go out and buy 2 stewing hens.

When I have a free day to make the chicken broth, I give myself plenty of time to cook it.  It’s not that it’s a lot of work, it just takes time.  I try to start mine earlier in the morning and allow it to simmer and reduce all day.  It probably isn’t a good idea to start cooking your broth at 9 pm, unless you like staying up all night and not sleeping.  It takes a minimum of 3 hours to turn bones into broth but I like to let mine go a lot longer than that.  The longer it reduces, the richer your broth will be.

Before starting your broth first gather your ingredients.  You’ll need onions, celery, garlic, carrots, salt and pepper.  And grab your container of chicken bits out of the freezer.

Put everything in a large stock pot.  Don’t worry about dicing or making your veggies pretty.  I just quarter the onion, cut the celery and carrots in half and let the garlic cloves whole.  Cover everything with water.  I put enough water so everything is covered by at least 3 inches on top.

Bring the whole thing to a boil, and then simmer for a minimum of 3 hours.  I let mine go for much longer than that.  This last time mine cooked for about 12 hours.  I’m not going to tell you to taste it to see if it’s done.  If you’ve cooked it for longer than 3 hours, it’s done.  Although I highly recommend letting it cook for longer than that.  At this point it’s probably more of a chicken stock. A more reduced, darker, stronger, thicker version of broth.  And amazingly yummy in recipes!

Now is the only “work” part this recipe really has.  After you’ve simmered the broth down, strain it through a colander into a bowl.  Actually you’ll probably need a few bowls.  You don’t realize just how much broth you made until you get to this point.  You can also strain it a second time through cheesecloth to get those small bits that the colander let through.

Once you have the broth strained stick it in the fridge overnight to allow the fat to rise and solidify at the top.  If you’re like me, your fridge is full of 25 dozen eggs and fitting a big pot in there is next to impossible.  I separate mine into 2-3 large bowls and try to maneuver things around to make it fit.  The next morning, take it out off the fridge and remove the hardened fat with a spoon.

If you aren’t interested in pressure canning this broth, you can put it into baggies and freeze it.  I always measured mine out into 1 or 2 cup baggies and wrote on the front of the bag how much was in it.

Otherwise, let’s get on to canning!

First, I use a Presto 23-quart pressure canner.  I love it, it’s easy to use and I’ve never had a single issue with it.  And the best part?  Amazon has them on sale right now!

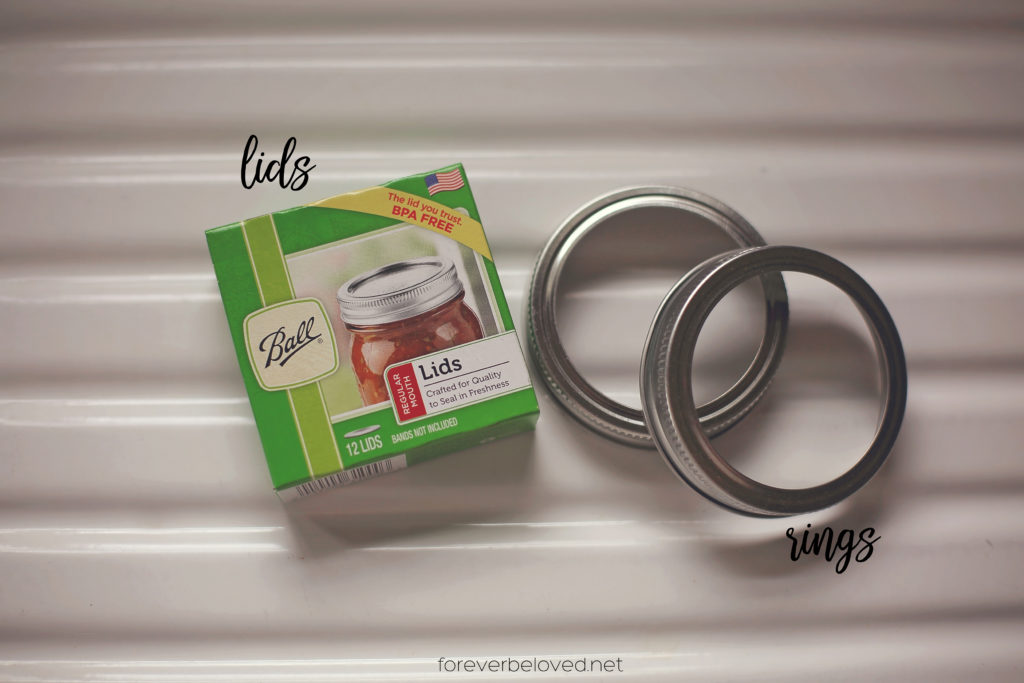
You’ll need to have your broth on the stove on low heat.  You want to put it into your jars hot.  Also prep your pressure canner by putting it on the stove and heating water in it.  Make sure to read your directions for your specific canner to see how much water they advise.  I put 3 quarts of water in mine.  Also, to keep your jars from being “spotty” you’ll want to add 2 tablespoons of white vinegar to the water.  You’ll also want to simmer your rings and lids on the stove as well.

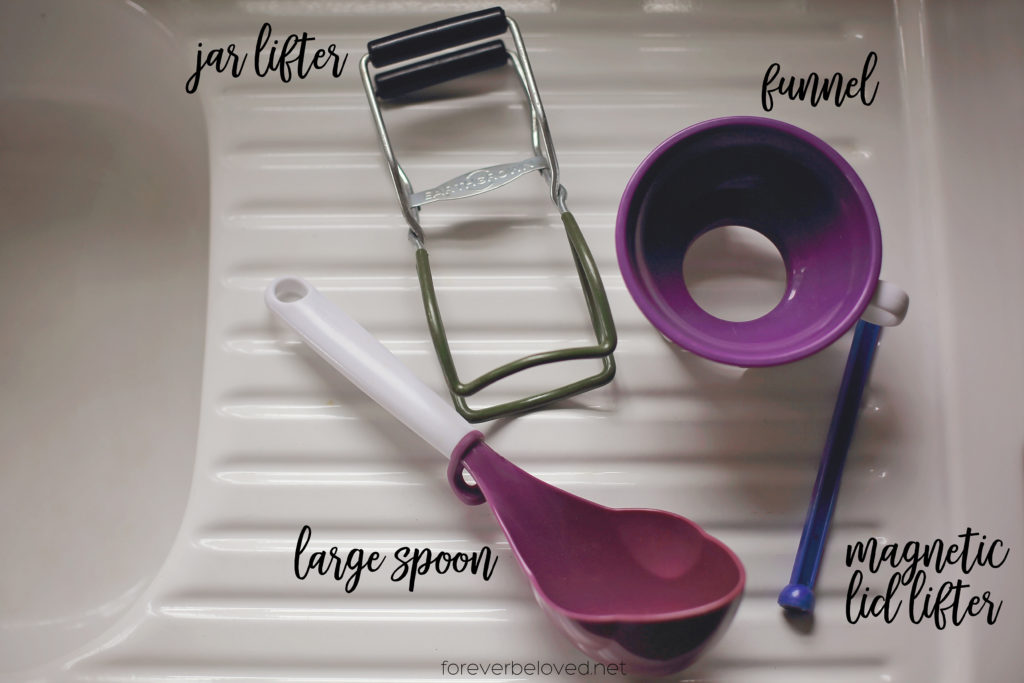
Gather up the rest of your tools that you’ll need.  You’ll need a funnel, magnetic lid lifter, a jar lifter and a large spoon.  Most hardware stores, and even WalMart, has canning kits.  The kits will have most of the supplies pictured below in them.

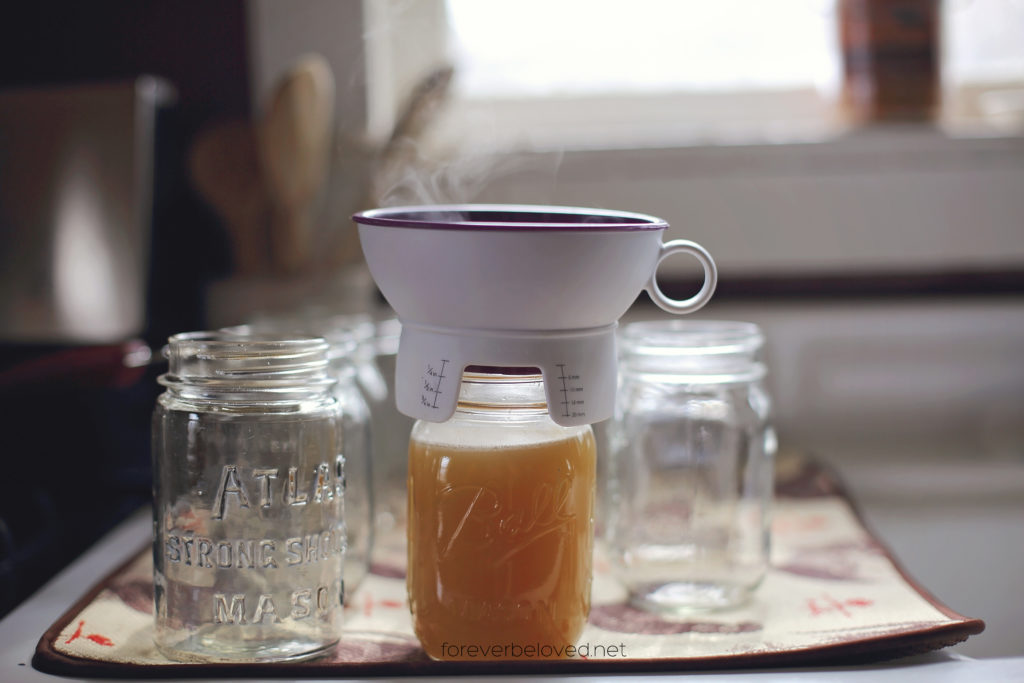
Fill your jars with hot broth.  Make sure you have 1″ headspace between the broth and the rim of your jar.  In canning, headspace is the amount of space you leave between the rim of the jar and whatever you’re filling it with.  Each thing requires a different headspace.  I found this handy dandy funnel that also has markings on the side to measure headspace.  Here is a little headspace chart to follow:

  • Leave 1-inch headspace for low-acid foods, vegetables and meats.
  • Leave 1/2-inch headspace for high-acid foods, fruits and tomatoes.
  • Leave 1/4-inch headspace for juicers, jams, jellies, pickles, and relishes.

Wipe the rim of the jar off.  Never forget this step!  Even when you’re using a funnel, you are bound to drip on the rim.  And if the rim isn’t clean, it won’t seal properly.

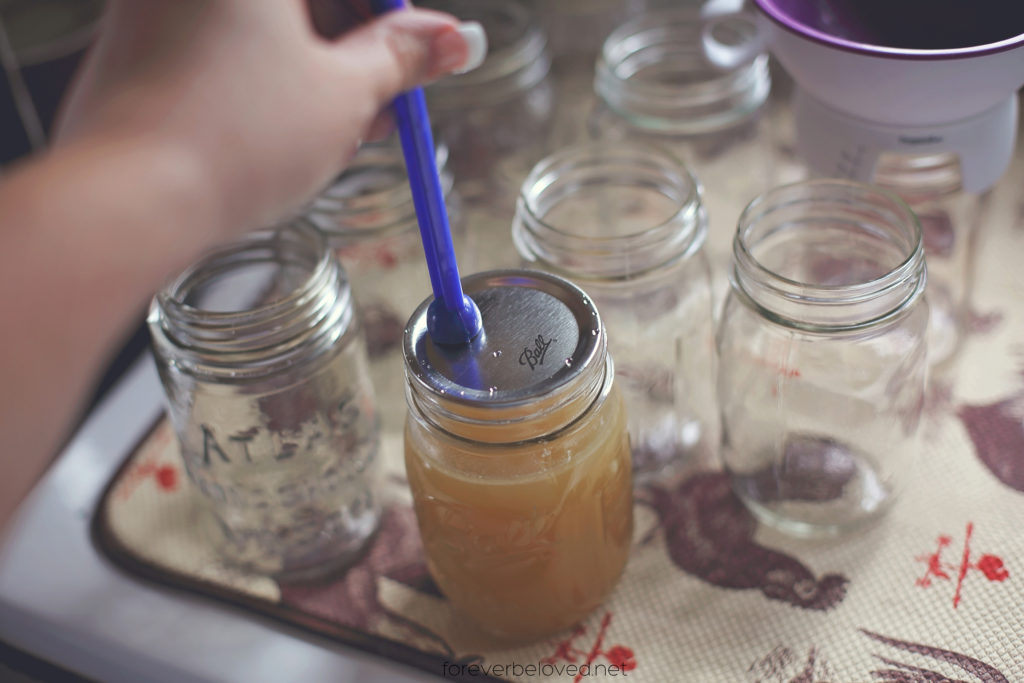
Using your magnetic lid lifter, pull out a lid from your pot of hot water and place it on the jar.

Put your ring on and finger tighten.  I use a towel or hot pad to hold onto the jar so I don’t burn my hand.  Don’t over tighten your rings.  Also, once the jars are sealed and cooled you can remove the rings.  The lids are what keeps the jar sealed.

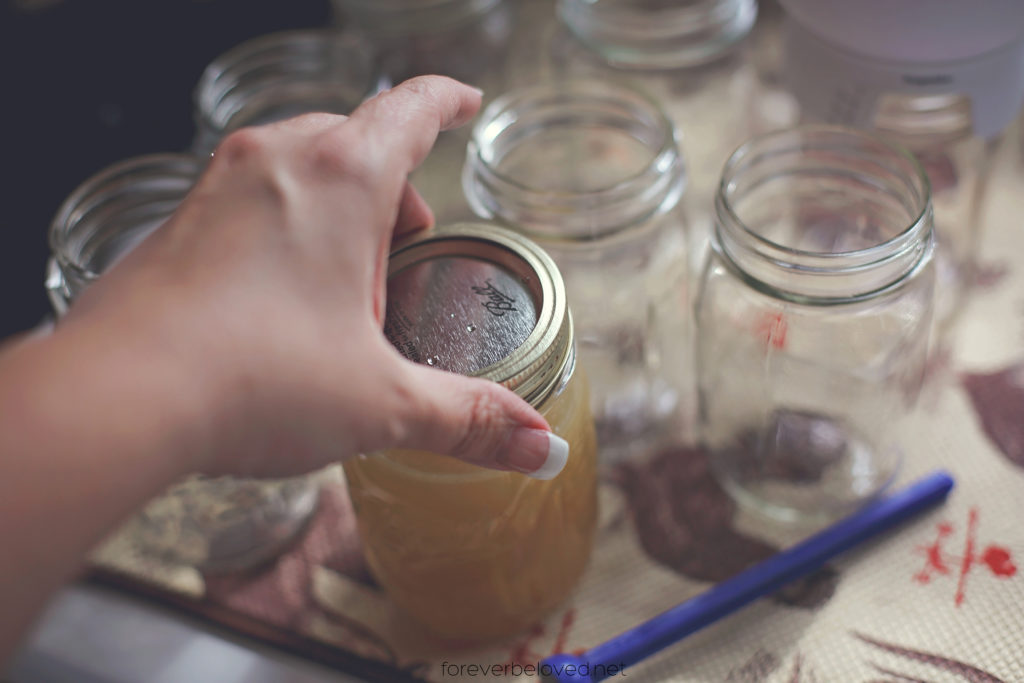
Place the hot packed jars in the pressure canner.

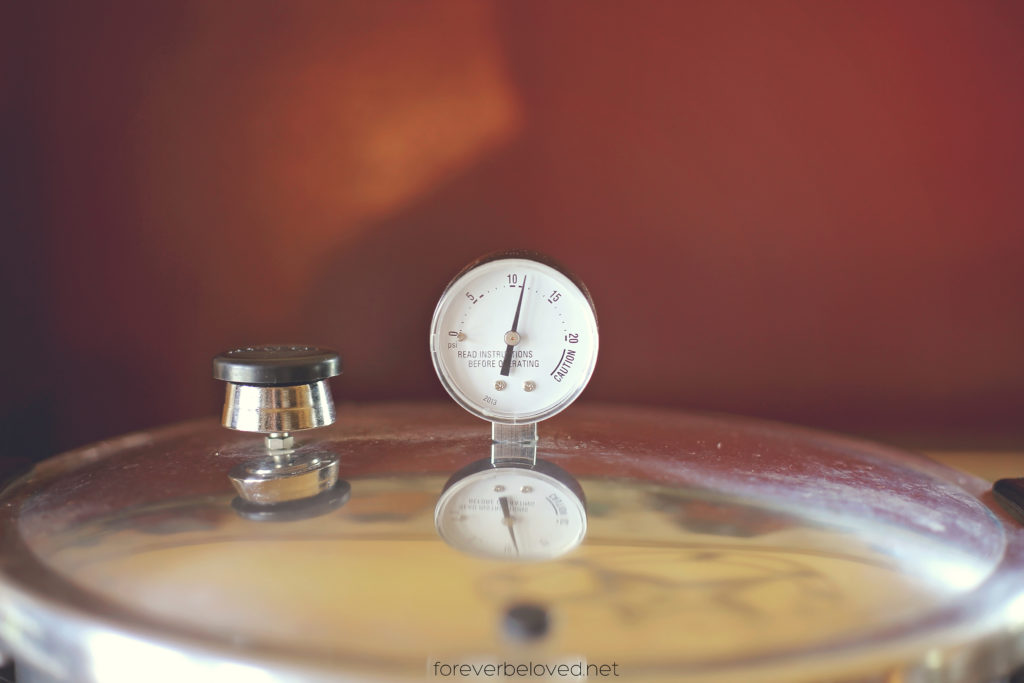
The first thing you need to do is vent your canner.  Venting means getting rid of the steam inside the canner so you can build up pressure.  To vent, you put your lid on and make sure it’s sealed  (follow the manufacturers instructions for this as well) and turn the heat up to medium or medium/high.  You DO NOT want your weight on yet.  When steam is steadily coming out of the vent, set your timer for 10 minutes.  Once the timer goes off, you’re ready for the next step.

Put your weight on the canner, being careful of the steam that’s coming out, and wait for it to come to pressure.  Once it’s up to pressure, set your timer for the appropriate time below.  Remember to only start the timer once your canner is up to pressure.  Waiting for the canner to get up to pressure sometimes takes several minutes, and it will feel like time stands still.  Just be patient, it will get there.

20 minutes  at 11 lbs for pint jars

25 minutes at 11 lbs for quart jars

You may need to adjust the heat up or down during this time.  If you see your pressure rising above what it should be, reduce the heat.  If you see it falling below what it should be, raise your heat.  I normally don’t leave my kitchen while I’m pressure canning, just so I can keep a close watchful eye on the pressure.

When your timer goes off, turn the stove off.  Actually, turn the stove off and walk away.  Go take a much deserved seat for a while.  You HAVE to leave the lid on and allow the pressure canner to return to normal pressure.  I just let mine sit for quite a while.  Once the pressure is down to normal you can remove the lid and take your jars out.  I use the jar lifter to remove them.  And I always set them on a kitchen towel then cover them with another towel.  I don’t want them to cool down too quickly.

If you are new to pressure canning, I highly suggest purchasing a book on it.  There are some variables to consider, like altitude, and a book would be a great resource to get you familiar with pressure canning.

Sure, there are risks when it comes to pressure canning. There are also risks when you light a propane grill or walk to feed your chickens in the snow.

If you know what you’re doing and understand what you’re working with, the risk is considerably lessened. When it comes to pressure canning, the more I learned about canners and how they function, the less nervous I was. Pressure canning is a great item to have in your food preservation arsenal.

And nothing is quite as satisfying after a long, exhausting day of canning than seeing all those jars full of food you prepared with love for your family.  Give yourself a high-five!


Filed in: homesteading, recipes • by Amy • Leave a Comment

August 8, 2016

My 5 Favorite Canning Recipes

When I was growing up I was blessed to not only have a Mama that grew her own food, but canned it as well.  Not only my Mama, but all the women in my family.  Many family gatherings would include a circle of women chatting about their recent crops and what they were planning on canning with them.  It was a given that once I had a household of my own, I would follow in all their footsteps.  And proudly, I have.

Once the end of summer draws near, I know it’s time to bring out the pressure canner and jars.  I couldn’t feel more in my element than I do in my kitchen with a pot of sauce simmering on the stove.
Throughout the years I’ve ventured a bit further than the basics my Mama canned, and I’ve found some new favorites of my own.  That is exactly what I want to share with you today, my top five favorite canning recipes!
Hot Pepper Dip
  • 7 green peppers
  • 7 hungarian wax peppers
  • 24 ounces ketchup
  • 8 ounces tomato paste
  • 1 tablespoon salt
  • 2 cups vinegar
  • 2 cups oil
  • 1 1⁄2 cups sugar
  • 2 garlic cloves
  • 2 large onions

INSTRUCTIONS:


Chop the peppers, onion and garlic; set aside.  {I put mine through a grinder}

Mix all ingredients except peppers and bring to a boil.

Boil for 10 minute stirring occasionally.  Be careful the bottom of the pan doesn’t scorch.  Add peppers, bring to a boil again.
To can, pour into jars.  Place rings and lids on jars, making it fingertip-tight. Place on a cloth-covered or wood surface, several inches apart, until cool. 
Spaghetti Sauce
  • 1⁄2 bushel tomatoes
  • 2 bulbs garlic
  • 4 hot peppers
  • 3 lb. onions
  • 1⁄2 cup salt
  • 1 1⁄2 cup sugar
  • 3 tbsp italian seasoning
  • 8 cans tomato paste
  • 2 cups oil
INSTRUCTIONS:
Put everything into a blender and puree.  I cut the stem part off the tomatoes, quarter them and put skins and all into the blender.  I also leave the seeds in two of the hot peppers to add some heat.
  
Bring it to a boil and cook until thick.  I cook mine for 4-5 hours, stirring occasionally.
To can, pour into jars.  Place rings and lids on jars, making it fingertip-tight. Place on a cloth-covered or wood surface, several inches apart, until cool. 
Zucchini Relish
  • 12 cups shredded unpeeled zucchini {I throw a cucumber or two in as well}
  • 4 cups chopped onion
  • 5 tablespoons canning salt
  • 1 green bell pepper, chopped
  • 6 cups white sugar
  • 2 1/2 cups white vinegar
  • 1 tablespoon cornstarch
  • 3/4 teaspoon ground nutmeg
  • 3/4 teaspoon ground turmeric
  • 1 1/2 teaspoons celery seed
  • 1/2 teaspoon ground black pepper
INSTRUCTIONS:
I put my zucchini, cucumber, onion and pepper through a grinder.  After ground, place the items in a large, non-metallic bowl, and sprinkle the salt over-top. Use your hands to evenly mix the salt throughout. Cover, and refrigerate overnight.

The following day, drain and rinse well with cool water. Squeeze out excess water and set aside. Place the sugar, vinegar, and cornstarch into a large pot. Add the nutmeg, turmeric, celery seed and pepper. Stir to combine, then add the drained zucchini mixture. Bring to a boil over medium-high heat, then reduce the heat to medium-low, and simmer 30 minutes.

Meanwhile, sterilize 7 one-pint jars and lids to hold relish. Pack hot relish into sterilized jars, making sure there are no spaces or air pockets. Fill jars all the way to top. Place rings and lids on jars, making it fingertip-tight.
Hot-Packing Method: Because the relish is hot when you pack it, I don’t put it through a water bath.  Mine is always fine and has always sealed.  You can always put yours in a water bath just to be sure. 

Water-Bath Method: Place a rack in the bottom of a large stockpot and fill halfway with boiling water. Carefully lower jars into pot using a holder. Leave a 2 inch space between jars. Pour in more boiling water if necessary, until tops of jars are covered by 2 inches of water. Bring water to a full boil, then cover and process for 30 minutes.

Remove jars from pot and place on cloth-covered or wood surface, several inches apart, until cool. 
Sweet Pickled Beets
  • fresh beets (any size will do)
  • 1 cup sugar
  • 1 cup water
  • 1 cup vinegar
INSTRUCTIONS:
Wash the beets, cleaning all the dirt off.  Cut the leaves off the beet about 3” off the beet to prevent the beet from bleeding out. 

Separate into sizes so little ones don’t get over cooked and big ones are not under cooked.  I like 3 kettles they boil faster that way.  Boil beets till tender, can be checked using a fork (like a potato).
Drain and discard cooking liquid; let beets cool so they can be easily peeled.  Hold the beet in your hand and squeeze it, it should pop right out of the skin.  Cut beets into 1/2” pieces, leaving very small beets whole.
Combine brine ingredients in a kettle.  Bring brine to a boil and simmer for 10 minutes.  Depending on the amount of beets you have, you may need to make more brine.

Fill jars within 1/2” from the top with beets.  Fill jar with boiling brine to 1/2” from top.  Place rings and lids on jars, making it fingertip-tight.
Hot-Packing Method: Because the brine is hot when you pour it in, I don’t put it through a water bath.  Mine is always fine and has always sealed.  You can always put yours in a water bath just to be sure. 

Water-Bath Method: Process in a boiling water bath for 30 minutes at up to 1000 feet in elevation.
Place on a cloth-covered or wood surface, several inches apart, until cool.  Any leftover brine can be stored in the refrigerator till the next time you can.
Canned Peaches
2 lbs peaches, per quart (up to 3 lbs)
5 cups sugar
10 cups water
INSTRUCTIONS:
To prepare peaches: Wash peaches; dip in boiling water for 30 seconds, then drop in ice water to loosen skins. Remove skins. Cut in half; remove pits and scrape away the red fibers around the pit, which can darken during storage. Set aside.

Combine sugar and water in a saucepan and bring to a boil until sugar is dissolved. Keep syrup hot. Drain peaches. Pack peach halves, cut-side down, into hot jars, leaving 1/2-inch headspace. Add hot syrup to within 1/2 inch of rim. Remove air bubbles with a nonmetallic spatula and add additional syrup, as needed.

Wipe jar rims and threads. Place lids and bands on jars.
Hot-Packing Method: Because the syrup is hot when you pour it in, I don’t put it through a water bath.  Mine is always fine and has always sealed.  You can always put yours in a water bath just to be sure. 
Water-Bath Method: Process in a boiling water bath for 25 minutes for pints, 30 minutes for quarts. 
Place on a cloth-covered or wood surface, several inches apart, until cool.  Any leftover brine can be stored in the refrigerator till the next time you can.

Filed in: homesteading, recipes, Uncategorized • by Amy • Leave a Comment

August 6, 2016

Five Ways To Prepare For Canning Season

Every year, as summer draws to a close I start gearing up for canning season. If you’re new to the canning world, or an old pro, hopefully these tips help you enter preservation season calm.  It’s super easy to get overwhelmed, believe me.  Hopefully this helps you be prepared to tackle those bushels of tomatoes, cucumbers and corn.

1. Set Goals

What are your goals for canning? You may want to save your family money or you may just enjoy the craft of it. You may have a garden and want to enjoy reaping the benefits of it all year long. You may enjoy canning because you have control over what goes into it (like no chemicals and preservatives).

You may have only one goal, or a few that I listed above. Think about your goals. Why do you want to do this and what do you want to get out of it?

I can for a few different reasons. I love that it saves our family money, it’s super yummy, it’s convenient and honestly I just really love canning. I love knowing that I can run downstairs and grab a jar of spaghetti sauce or chicken broth.

2.  Understand Canning Styles {there are two}

-Hot water bath canning: submerge canned foods in hot water and boil the jars for a certain length of time


-Pressure cooker canning: enclose canned foods in a pressure cooker and process them for a certain length of time. The temperature inside a pressure cooker is higher than is possible in a pot of boiling water.
3. Check Your Equipment
Even if you are a seasoned canner, you normally find that first canning session awkward.  Finding your rhythm takes a bit. Preparing ahead of time can make the process so much easier. An important step is taking the time to evaluate your canning equipment.
-Canning Tools: Gather together all your canning utensils including spoons {I prefer wooden}, your jar rack, magnetic lid lifter {a tool for picking up and placing just one lid at a time}, canning funnel {to get liquids into the jars without spilling all over} and jar lifter {essential for getting hot jars out of hot water safely}. WalMart carries a canning starter kit and a canning utensil kit.  I purchased a medium sized plastic tote also.  That is what I store all my canning items in.  I can just pull that tote out and know all my canning supplies are in it rather than searching all over for them.  Not to mention they are easier lost if they aren’t stored together.

-Canners: If you’re planning on canning anything that requires the water bath method, you’ll need a pot tall enough to accommodate your jars. Make sure your pot has enough room for a couple inches of boiling water and a couple inches of head room above that is fine for boiling water bath canning. Your pot will also need to have a canning rack in it.

Some of the items you’re planning to can may require pressure canning {green beans is one example}.  Wash and rinse your canner to start with.  Check the sealing rings and over-pressure plug. Replace if needed. These should be replaced every two to three years. Review your canner’s manual to refresh your memory of the canning procedure.
-Lids and Rings: Check over all your rings and discard the ones that are distorted, dented, or rusty as they could cause your jars not to seal properly.  If you’re like me, you always have way more rings than you’ll ever use. I’m not quite sure how that happens honestly. If you are buying new jars, a lot of times they will come with lids and rings.  Purchase plenty of new lids early in the season. You don’t want to run out when elbow deep in sauce.  

-Canning Jars: Check your jars carefully for cracks and chips. Hold on to the original boxes for storage. Let me say that again, hold on to the original boxes. When this girl started canning, she threw those boxes away. Big mistake! I store my canned food in the basement, and those boxes make life so much easier when you’re carrying precious jars of amazingness down flights of stairs. Take inventory of your empty canning jars so you have an idea of how many you have on hand. Watch the local sale flyers, normally around canning season stores will have sales. The jars will need washed before use. I fill my dishwasher up and start the cycle when I start my canning. Not only are the jars clean, but they’re normally still warm when I’m ready for them.

4. Buy Your Basics

Pull out all those recipes, read over them and make sure you have the ingredients on hand. Trust me, this is important. You don’t want to get your spaghetti sauce nearly done and realize you’re out of tomato paste. Been there, done that. 

There are some items that I already know I will use a ton of throughout canning season. Tomato paste, vinegar, salt, sugar and ketchup are my must-haves for canning season. Your basics might also include pectin and bottled lemon juice.

Stocking up also means you must sort out your recipes first and decide what you’re canning. So before you begin, search out recipes in your favorite cookbook or look on Pinterest. Here is a link to my Pinterest board all about canning. There are so many amazing canning recipes there!

Check through your spices, too, and make sure you’re good for italian seasonings, cinnamon, pickling spice, or whatever spices you know will be used. I highly recommend buying your spices in bulk. Fresh spices mean tastier preserves!

5. Invite Your Girls Over

An important part of this process is not overwhelming yourself. And if this is your first time canning, trust me, you’ll want all the help you can get. Especially if it’s someone who has canned prior. Plus it’s just more fun to do this kind of work with another person.  Chatting and laughing make the day go faster!

And there you have it. You’re all ready for a fun-filled day of canning. And listening for that ping ping coming from your kitchen later in the day. 

Watch my blog for an upcoming post, my top 5 favorite canning recipes!

Filed in: homesteading, Uncategorized • by Amy • Leave a Comment

  • « Previous Page
  • 1
  • …
  • 3
  • 4
  • 5
  • 6
  • Next Page »

profile

profile

Wife & Mama • Iced coffee seeker & curator of chaos • Collector of words & magic • Obsessed with laughter & bright lipstick • Dreaming & homesteading in the hills of PA

  • Bloglovin
  • Email
  • Facebook
  • Instagram
  • Pinterest
  • Twitter

Search

Categories

Blog Archive

Subscribe to the Blog

Enter your email address to subscribe to this blog and receive notifications of new posts by email.

Join 32 other subscribers

Find Me Here

image iconimage icon

Copyright © 2025 · Theme by Blog Pixie


Loading Comments...