• Meet Me
  • Sponsor
  • Testimony
  • Print Shoppe
  • Recipes

Forever Beloved

Faith, Love & Truth

March 4, 2019

Canning Chicken

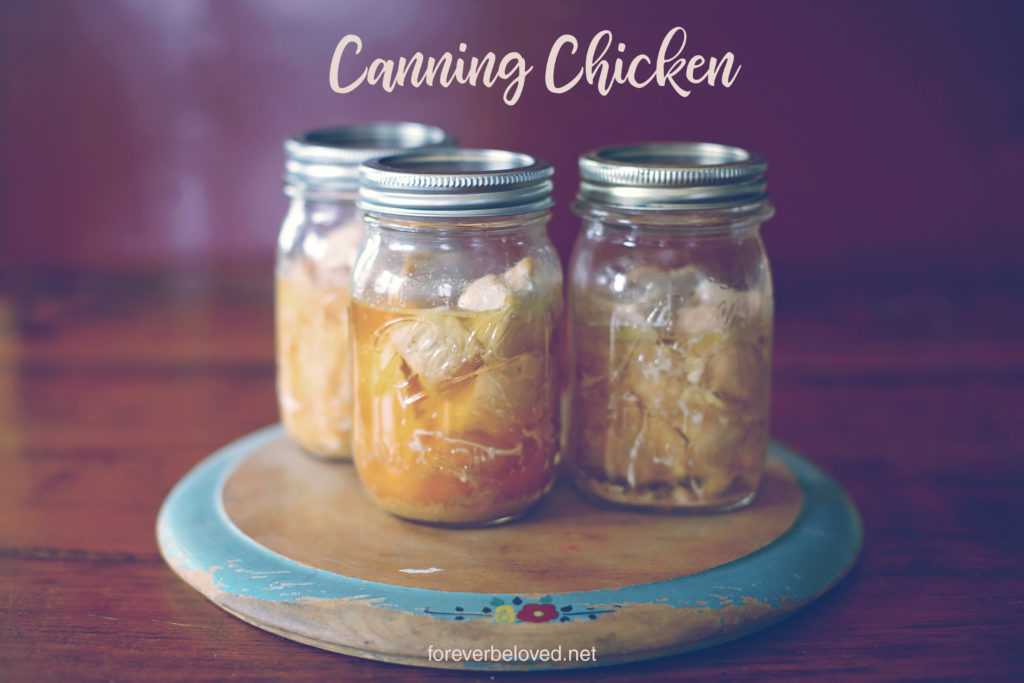
This week a local farm had a great sale on boneless, skinless chicken breast. They were selling them in 40 lb. boxes, so I bought 80 lbs. to can.  This is my absolute favorite time to stock up, when a local market or farm is having a great sale!  With the amazing sale on chicken, I knew it was time to get canning.  

Home canned chicken is so easy and yummy.  Every bite is tender and so full of flavor, not to mention quick and easy to use.  I will never buy canned chicken from the store again! It is very moist and falls apart with the slightest pressure.  It is not like crockpot chicken breasts that turn grainy and ironically dry after cooking. It is not like boiled chicken that can get rubbery.  This is the perfect, moist, shredded chicken.

You can use canned chicken is any recipe that calls for cooked chicken. Think chicken enchiladas, chicken and dumplings, chicken gnocchi soup, chicken noodle soup, chicken salad sandwiches, buffalo chicken dip…the list could go on and on. And just think how easy dinner prep would be if you cut out the time of having to prepare the chicken beforehand!

With a big canning day ahead, I knew I had to bring y’all along!

First, I use a Presto 23-Quart Pressure Canner and Cooker.  I love it, it’s easy to use and I’ve never had a single issue with it.  It comes with an in depth instruction booklet full of recipes.  I also purchased an extra rack to use in it. I purchased this Presto rack from Amazon. By having two racks, when I can with pints I can double stack them. I cannot speak on whether you can double stack without the rack, as I never tried it.

You first start with clean, sterilized jars.  I run my jars through a cycle in the dishwasher to sterilize them.  Being that my chicken is cold when I pack it in, I don’t keep the jars hot.  I don’t want to take the chance of having broken jars in the canner.  We all know what happens when you mix hot and cold.

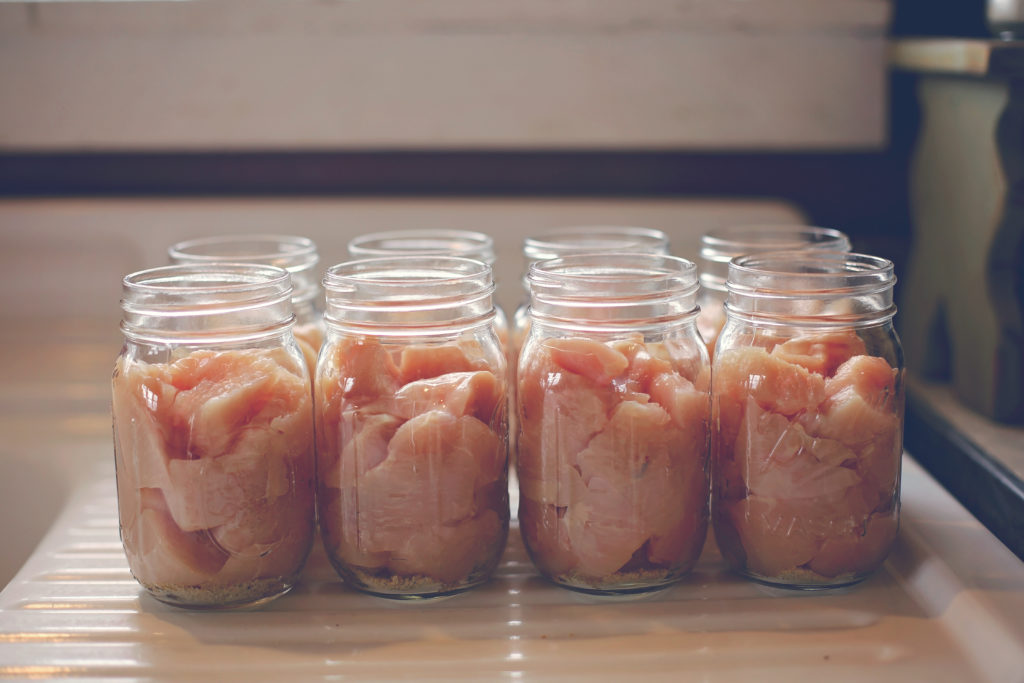
I normally figure around 1 lb. of chicken fits in one pint. So gauge how many pints you will need by that. If you are canning 10 lbs. you’ll need 10 pint jars. I am canning 80 lbs. so I have 80 pint jars on hand.

Also I will need to can my chicken in batches. My canner, with the extra rack, will hold 18 pint jars. So I will need to do 5 batches in my canner. While time consuming, it’s worth every minute.

The process I’m describing below is called a raw pack, meaning I do not cook my chicken before I can it. I pack it into the jars raw.

I begin my preparing the chicken. I do like to cut it into chunks so it is already an edible size when it comes out of the jar and it comes out of the jars easier.  I also don’t have to cut it later, I can just throw it into whatever I am cooking. The canned chicken will shred easily as you pull it out.

As I’m cutting the chicken into chunks, I’m also cutting off any bits of gristle, bone or veins they have on them.  I save these little bits and put them in my freezer to use the next time I make homemade chicken broth.   

In the bottom of each jar, I put a 1/2 tsp of salt.  I then pack the chicken chunks in on top.  I fill the jars about half-way, then push it down and make sure all the nooks and crannies are filled in.  Then packing more chicken chunks in on top.

Make sure you leave 1 1/4″ headspace between the chicken and the rim of your jar.  I have learned not to fill the jars exactly 1 1/4″ from the top.  I stop at maybe 1 1/2″ or so.  I noticed that some of the juices come out of the jar during processing.  If you under-pack the jar just a smidge it takes care of that problem.


In canning, headspace is the amount of space you leave between the rim of the jar and whatever you’re filling it with.  Each thing you can requires a different headspace.  I have a funnel that also has markings on the side to measure headspace.  Here is a little headspace chart to follow:

  • Leave 1-inch headspace for low-acid foods, vegetables and meats.
  • Leave 1/2-inch headspace for high-acid foods, fruits and tomatoes.
  • Leave 1/4-inch headspace for juicers, jams, jellies, pickles, and relishes.

You don’t need to add any liquid to the chicken.  When it cooks, it makes it’s own liquid.  Real, fresh, yummy chicken broth!

Wipe the rim of the jar off.  Never forget this step!  Even when you’re using a funnel, you are bound to get something on the rim.  And if the rim isn’t clean, it won’t seal properly. You don’t want to do all this hard work just to have your jars not seal.

Put your lids and rings on the jars.  Since we are doing a “cold pack” for the chicken, I don’t heat mine up before placing them on the jars.

Also since we are doing a “cold pack”, I didn’t prep my pressure canner ahead of time.  Being that my jars were still cold from putting cold chicken in them, I wanted to prevent my jars from breaking once the canning process started.  I put 3 quarts of hot tapwater in the pressure canner and sat my jars down in.  I gave them enough time to warm up a bit from the water before I even turned the burner on.  Make sure to read your directions for your specific canner to see how much water they advise.

TIP: to keep your jars from being “spotty” you’ll want to add 2 tablespoons of white vinegar to the water.

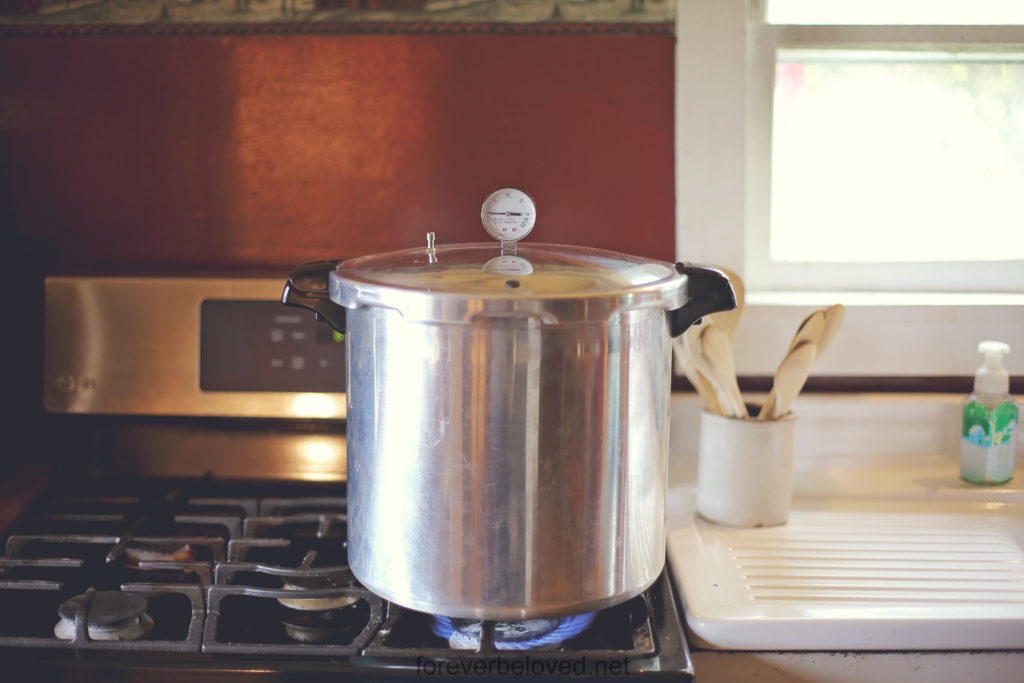
The first thing you need to do is vent your canner.  Venting means getting rid of the steam inside the canner so you can build up pressure.  To vent, you put your lid on and make sure it’s sealed  (follow the manufacturers instructions for this as well) and turn the heat up to medium or medium/high.  You DO NOT want your weight on yet.  When steam is steadily coming out of the vent, set your timer for 10 minutes.  Once the timer goes off, you’re ready for the next step.

Put your weight on the canner, being careful of the steam that’s coming out, and wait for it to come to pressure.  Once it’s up to pressure, set your timer for the appropriate time below.  Remember to only start the timer once your canner is up to pressure.  Waiting for the canner to get up to pressure sometimes takes several minutes, and it will feel like time stands still.  Just be patient, it will get there.

  • 75 minutes at 15 lbs for pint jars (if you are under 1,000 ft. altitude, use 10 lbs)
  • 90 minutes at 15 lbs for quart jars (if you are under 1,000 ft. altitude, use 10 lbs)

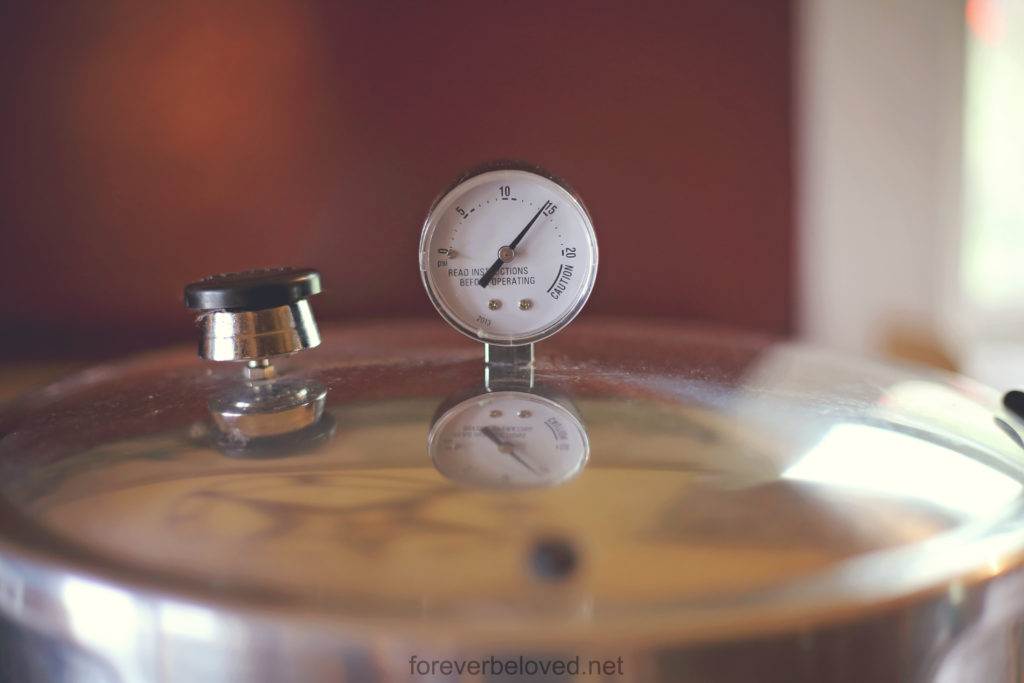
You may need to adjust the heat up or down during this time.  If you see your pressure rising above what it should be, reduce the heat.  If you see it falling below what it should be, raise your heat.  I normally don’t leave my kitchen while I’m pressure canning, just so I can keep a close watchful eye on the pressure.

When your timer goes off, turn the stove off.  Actually, turn the stove off and walk away.  Go take a much deserved seat for a while.  You HAVE to leave the lid on and allow the pressure canner to return to normal pressure.  I just let mine sit for quite a while.  

Once the pressure is down to normal you can remove the lid and take your jars out.  I use the jar lifter to remove them.  And I always set them on a kitchen towel then cover them with another towel.  I don’t want them to cool down too quickly.

Do not disturb the jars as they cool. After the recommended 12 hours, you may wipe the jars off, test the seals, remove bands and date the lids with a permanent marker. I highly recommend dating the jars. If any of the lids have not sealed, you will want to place the jar in the fridge for immediate use. To know if it is not sealed before the 12 hour mark, look at the lid closely to see if it has flattened or turned concave on the top. If it has, it is sealed. If it is convex, it may not have sealed and I would store it in the fridge until you can manually test it by pressing the center of the lid and seeing if it flexes up and down when pressed.

Nothing is quite as satisfying after a long, exhausting day of canning than seeing all those jars full of food you prepared with love for your family.  Give yourself a high-five!  And sit back, take a rest and listen for that familiar ping coming from the kitchen!

If you are new to pressure canning, I highly suggest purchasing a book on it.  There are some variables to consider, like altitude, and a book would be a great resource to get you familiar with pressure canning.

The canned chicken is stored on the shelf in the pantry for up to 2-5 years.  No fridge or freezer needed.  You don’t have to heat it up to eat it either.  You can open it and eat it out of the jar if you wanted to, like tuna.  Another great part about canned chicken is the liquid inside is now chicken broth you can use too!  So many possibilities and my favorite part is canned chicken doesn’t take up any fridge or freezer space!

Keep watching the blog for more homesteading recipes.  Coming up soon, canned chicken stock with all those bits of chicken I have waiting in the freezer for me. 

Filed in: homesteading • by Amy • Leave a Comment

April 25, 2018

Dehydrating Strawberries

While I have always been comfortable canning foods, dehydrating was a different story.  Up until this point in time, my experience in dehydrating put me in the intermediate category. I could proudly claim dried herbs and venison jerky, but that was as far as my dehydrating experience went.  But a recent Facebook post peaked my interest, claiming dehydrated strawberries tasted just like Twizzlers.  Over the following days I couldn’t stop thinking about and knew I had to try it.

My dehydrator is a smoke-colored Ronco brand, circa 1993, sold in one of those fabulous early 90s infomercials.  The infomercial even included a shout out for that fabulous spray on hair for bald spots.  Basically spray paint for your head.  My father-in-law gave me this dehydrator years ago, and with not really having much experience with it I just packed it away.

My husband and I were at our local grocery store this week, and they had strawberries on sale 2 lbs. for $5.  As soon as I saw them, I knew I would quickly be getting that dehydrator out of the closet and putting it to use!

First I washed the fruit very well.  You could use an all natural produce wash if you want, I just used water for mine.  You don’t need to dry them, since they’ll dry in the dehydrator anyway.  Just realize working with dry fruit is easier and less messier than working with wet fruit.  Cut the stems off of each strawberry and set them aside.  If you have chickens (or a rabbit that lives in your house) they love these strawberry tops!

While some recommend blanching your strawberries before dehydrating them.  Don’t waste your time.  It is totally unnecessary.  Also when you water-blanch you will lose water-soluable vitamins.

Laying the strawberries on their sides and slice them.  When slicing the strawberries, the slices should be as uniform in thickness as possible so that they dry evenly.  The slices should be 1/4″ for thin pieces or 3/8″ for thicker piece.  Lay the slices on the dehydrator trays in a single layer.  The end pieces should be laid with skin side down.  Make sure to place them far enough apart so they don’t touch or overlap.  You want to allow air circulation.  You should leave at least 1/4 inch space around the food pieces.

Some of the strawberry slices may be small and would easily fall through the tray as they shrink.  My dehydrator came with an insert that I can put underneath the fruit to prevent them from falling through.  If yours doesn’t have an insert, I would recommend checking the website of the manufacturer that made your food dehydrator and ordering mesh trays.

Allow the strawberries to dehydrate for 8-18 hours.  My dehydrator has a single heating element in the bottom, which means rotating the trays often is a must.  The strawberries are done when you squeeze them and there is very little “squish” left.  Since this was my first time dehydrating strawberries, it was a bit of trial and error for me.

If your slices aren’t perfectly even in thickness, as mine obviously weren’t, you may find that some strawberries dehydrate faster than others.  Just remove the ones that are finished and keep dehydrating the ones that are not.  Most of my strawberries were done in around 15 hours, but some of the bigger pieces had to go for around 24 hours.  I recommend tasting as you go until you get to your desired doneness.

When they are done, you will have dehydrated strawberries and feel pretty accomplished.  I was shocked how sweet they are.  And yes, they absolutely taste like Twizzlers!

Filed in: homesteading, recipes • by Amy • Leave a Comment

April 19, 2018

Before You Get Chickens

chicken

In this house, we are animal lovin’ fools. I must add, I was also born with a touch of farmer in me. So for years, having backyard chickens has crossed my mind. Every time I would bring it up, I was met with a resounding no. But this girl, she’s a persistent one! I guess I just wore them down until the answer yes {actually, more like an I guess so}.

I spent months researching different breeds and narrowing down what ones I wanted.  One day, I just took the plunge and ordered them. I just jumped in blindly with both feet. I kinda roll like that sometimes. I think that might be a quality of mine that drives my Mama nuts.

I love having my own chickens!  But the process of deciding to get day-old chicks to building a coop to learning how to care for them has a steep learning curve.  There are so many things I wish I would have known before I dove in head first.  Some lessons are just plain painful {and expensive} to learn by experience. So hopefully I can share some honest, self-learned lessons here that will spare you from those.

Just do it. That’s my first piece of advice. Just take the plunge and get them. But first, check your local ordinances and zoning code regulations. I live in the country, so I didn’t really have any I needed to abide by. I know many forbid roosters and some even have a limit on the number you can have. I would also assume if you live somewhere that requires building permits, you might need one to build your coop.

Decide on which breeds you want.  I have so many different breeds in my flock, I’d guess over 20 different breeds!  I say variety is the spice of life, mix it up if you can! People are so impressed by how beautiful my flock is, and it is easy to remember all of their names when they are all unique.  Plus, my egg basket looks mighty pretty when I carry it in the house every day!

If you’re buying chicks, remember vent sexing is only 90% accurate. So even when you’ve only ordered females, you may get males. I think we’ve all named a Lucy later to realize it’s a Ricky. Chances are you will discover you have a male at some point too. So if you live in a city where roosters aren’t allowed, have a plan ahead of time.  That may very well mean getting rid of a super sweet roo that you’re attached to.

Have what you need before they arrive. If you buy them as chicks, you will need to have a brooder set up. A brooder is a heated container that can have it’s temperature controlled. It’s used to house your chicks, with their feed and water, until they are 6 weeks old and ready to go outside. Although I will tell you, your chicks can’t move outside until the weather is warmer. I waited until the days were in the 60’s or better. So if you purchase during the winter months, get ready to have those babies in your house for a good while. Unless you have a heated coop.  After those 6 weeks are up, you’ll need to have their coop ready outside.

Coops don’t need to be fancy.  In fact, our first coop was an old camper my husband got for free.  I spent some time tearing out what I needed to and got it all ready for them.  It worked out perfectly!  It was already insulated, had functioning windows, had lots of cupboard space (to hold feed, supplies, etc.) and even had a little door on the side as their access to their run.

The average chicken has a lifespan of around 10 years. On average, chickens lay productively for the first five years or so, then gradually taper off and may only lay once a year in their old age. That means within a relatively short period of time, you’ll have chickens that aren’t laying at all, but continuing to eat and poop to their heart’s content. Chickens can live up to an average of 10 years (though some may make it to 20 years!), depending on the breed and environment.  So be thinking of what you will do with your chickens once they are elderly.  I plan to just keep mine as they are now, in the coop with all their chicken friends.

Chickens have to be shut up at night or they will get killed.   For the first year, I never allowed my girls to free range outside the coop.  I was too afraid of what might happen to them.  One day, I started letting the chickens out to free-range during the day.  And they loved it!  Once dusk sets in, they go back to the coop and get settled into bed.  Chickens are basically the snack food of the predator world. Think foxes, raccoons and even hawks like to have a little evening chicken snack. Be sure to lock them in a coop each night.

Some chickens are just mean. In fact, I have two mean witches in my coop right now. And if they don’t soon shape up, I have their walking papers ready. They are bullies and just love to pick on whoever is bottom of the pecking order.

But not all roosters are mean.  I have had some super sweet roosters.  And I mean like pick-them-up-and-carry-them-around sweet.  I’ve also had some doozys.  In fact, I had two roosters that, while nice to me, weren’t so nice to my ladies.  They were terrorizing one hen in particular to the point that she wouldn’t leave the nest.  Those two roosters had to be re-homed.

Oh yes, let’s talk about the pecking order. Even when they are chicks, you will see them chest bumping and stretching their necks out at each other. As they grow older, this “fighting” will continue. They are establishing a pecking order, so don’t freak out. Every coop has one and it’s just natural for them to establish one.

Your pullets (female chickens under one year) will start laying when they’re between four and six months old. Don’t be concerned if the first eggs will be small, they’ll get larger with time. And let me tell you, those first non-egg months drag on. Every morning I would trot to the coop, hopeful to see my first egg. Nothing. You see, I had this perfect little laying box set up for them. And that’s where I expected them to lay. Then one night I was getting a little heat light set up for them. I bent down to plug it in and could not believe my eyes. There was a pile of eggs like you would never believe…13 of them! They had been laying for days, and I missed it. So also realize, they will lay where ever THEY want to, not where you want them to.

Hens will take a break from laying eggs in the winter months. Generally this is when they lose old feathers and grow new ones.  And when they do this (called molting) they will look like the saddest bunch of girls around.  The first hen I had molt, I thought she was dying.  So prepare yourself for that also.

Hens need about 14 hours of daylight to lay eggs consistently. Although I have to say, my girls never stopped laying completely. They may have slowed down a bit, especially on the extremely cold days. But every single day this winter I got at least one egg.

Sometimes chickens get sick, and you will bring them inside.  We’ve experienced this from time to time.  The issue is once a chicken is sick, the other chickens will see them as weak.  They will pick on them and peck them.  The end result isn’t pretty.  I don’t have a garage, so when mine get sick they always make their way inside.  And nothing is more shocking than said chicken being a rooster, and hearing it crow inside your house the next morning.

Local veterinarians probably won’t be able to help you either, as very few of them are trained to understand poultry diseases. You will have to either read up on your own or find other more experienced chicken keepers who can advice you. What I would suggest is joining a group, like Backyard Chickens. There are also quite a few Facebook group specifically for chicken owners. You have no idea how many questions I ask them. Seriously y’all, I bet they are sick to death of me. BUT that is the perfect way to find out what is going on with your sick chicken.

Chickens do get sick and die. Good night, do I ever know this. We’ve lost a few from our flock in less than a year. I actually lost my very favorite super-sweet roo during his first winter.  He died in my house, laying beside me on the floor, surrounded by my family.  And I cried, bucketloads.

Different breeds lay different colored eggs.  When I was choosing which breeds I wanted, I knew I wanted my egg basket to look pretty.  But in my mind, eggs came in two different colors…white and brown.  Because, I mean, that’s all we really see in the stores.  Throughout the years as my flock grew, so did my egg colors.  I now have nearly every shade of green and brown you can find, some are even speckled.  I have the prettiest light blue.  I also have white, cream and one sweet girl that lays almost a pink color.  If you want your egg basket to look pretty do, do your research on what color eggs each specific breed lays.

Chickens can deal with cold weather far better than hot weather. The body temperature of a chicken typically hovers around 102 degrees. Because they are wearing a down coat all year round, they will need access to shade and cool water at all times.

Chicken math is a real thing. You start out with 8 cute little chicks. Surely that’s enough, right? They grow up, move to the coup and start laying.  And then Rural King moves into your area, and sells chicks year round.  And, I mean, you HAVE to go in there to get supplies. Hearing those sweet little chirps coming from the back of the store. There is no possible way to walk past them without looking, unless you’re the scrooge and don’t have a heart! You see those little balls of fluff and instantly, you must add to your flock. At that point, it’s not even a question. Chicken math has already set in, and there isn’t any going back. Before you know it you have 16 in the coop, 4 in the smaller coop and you’re getting ready to place your Spring chicken order. Not that I’m speaking from experience or anything.

Chicken math may also branch out into other birds. Such as pigeons, as we found out a few years ago. We had a pigeon named Tim living in our coop for a little over a year. Fairly sure he thought he was a chicken, he would get right in there and fight for food with those big girls. He spent some time free-ranging with the chickens, he would take a big fly around the neighborhood and then come back to the coop at dusk and settle into his bed for the night.  Once he was strong and brave enough, he just kept on flying and didn’t return.  I’d be lying if I said it didn’t break my heart a bit.

There will always be lots of poop. You just have to get use to it and not get skeeved out. One day I tended the chicks before rushing out the door to meet a friend for coffee. In all my rushing, I didn’t realize I somehow had poop on my jeans. Seriously, get ready for chicken poop for days. I’m still baffled at how one little bird can poop so much. Goodness.

Keep water and food bowls clean and free from funny-looking growth {and poop}. You have to clean their water container daily. And as soon as you clean it, they will scratch around and throw nonsense back in it. And usually some jokester will somehow poop in it as well.  I even had some wild girl lay an egg in the water last week.  I’m nearly convinced they do this as a way to drive me insane. But seriously, keep everything clean in the brooder and the coop.

Chickens are nosy.  They will watch everything that happens in the yard.  And they will inspect everything within their reach.  If it’s in their coop, they will peck at it and inspect it. This will prompt all other birds to follow suit.  I’ve had girls pull insulation out of the walls and destroy a paper plate in minutes.  Keep this in mind when building your coop.  Make sure anything dangerous to them is well out of their reach.

And last but not least, you will talk to your chickens. You will name them and talk to them like they are human. You will have your morning coffee with them. Or wait, that might just be me. You will take selfies with them and Instagram them. You will notice their little personalities, and occasionally try to talk to non-chicken people about them. Those people have no desire to hear your chicken stores and will think you are crazy. These chickens will come running when they hear your voice, and your heart will flutter. They love me, they really love me ♡

Filed in: homesteading • by Amy • Leave a Comment

  • « Previous Page
  • 1
  • 2
  • 3
  • 4
  • …
  • 6
  • Next Page »

profile

profile

Wife & Mama • Iced coffee seeker & curator of chaos • Collector of words & magic • Obsessed with laughter & bright lipstick • Dreaming & homesteading in the hills of PA

  • Bloglovin
  • Email
  • Facebook
  • Instagram
  • Pinterest
  • Twitter

Search

Categories

Blog Archive

Subscribe to the Blog

Enter your email address to subscribe to this blog and receive notifications of new posts by email.

Join 32 other subscribers

Find Me Here

image iconimage icon

Copyright © 2025 · Theme by Blog Pixie


Loading Comments...